
DE-ICER SYSTEM
Installation & user guide
Everything you need to install, set up and maintain your VAKE De-Icer System for effective winter protection of your boat or dock. For best results, read the instructions before installation and make sure the system is correctly positioned before freezing temperatures arrive.
Before you start
The VAKE De-Icer System uses two air compressors to create a continuous flow of bubbles around your boat or dock. With no machinery or electricity underwater, the system is designed for safe and dependable operation.
The V-12 model is suitable for boats approximately 12–13 metres long, with a waterline of around 12 metres. The V-12+ is suitable for boats approximately 15–16 metres long, with a waterline of around 15 metres.
For docks and jetties, the maximum protected length is approximately 24 metres with the V-12 and 30 metres with the V-12+. A water depth of around 1–2 metres is required for good circulation, while access to deeper water can improve performance during prolonged periods below –15°C.

One important rule
The hose may only have one highest point. This allows condensation inside the hose to drain either into the water — preferably — or back towards the compressor. Avoid loops, dips or sharp bends where condensation can collect, as trapped water may freeze and block the airflow. Always deploy the VAKE hoses before ice begins to form.
1. Place the compressors
Boat
Choose a suitable location where the compressors can remain throughout the winter and where the air hoses can be routed without sharp bends.
The compressors can be placed inside the boat. This also allows excess energy from the compressors to provide a small amount of heat inside the boat.
The compressors are IPX4 rated and can also be positioned outdoors under a roof or tarpaulin.
Wherever they are placed, make sure the air supply cannot be blocked by heavy snowfall.
Important: Never position the hoses or pumps below the waterline inside the boat.
When installing the compressors inside the boat, the air hoses can be routed through a ventilation opening. Another option is to make a plate with two hose openings that fits into an openable window.
Make sure the hoses are never bent or pinched, as this will restrict the airflow.
Dock
The compressors are IPX4 rated and can be placed outdoors under a roof or tarpaulin.
If no suitable shelter is available, a small protective cover can be constructed. Always make sure that snow cannot block the compressors’ air supply.

2. Prepare the air hoses
Screw the brass hose connector into the air compressor by hand until the rubber seal is properly seated.
Do not use tools. Hand-tightening is sufficient. Using tools may damage the rubber seal.
Connect the hose and tighten the supplied hose clamp. Start the compressor briefly and listen for any air leakage around the connection.
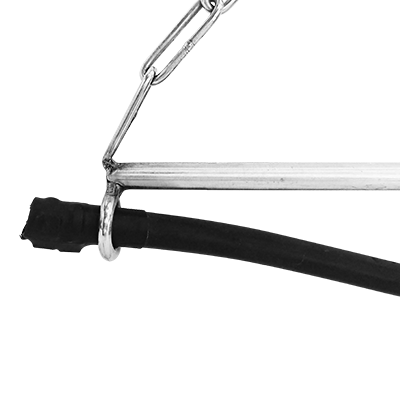
Attach the suspension at the end of the bubble hose.

Attach the suspension at the red marking on the bubble hose.
3. Position the air hoses
Boat
Position one hose along each side of the boat.
The bubbles create an upward flow of water that is redirected outwards by the shape of the hull. The two-pump setup also provides redundancy: if one pump stops, the remaining pump can continue to maintain a reasonable ice-free area while the other is repaired.
The hoses should be suspended approximately 1.5 metres below the surface.
Keep the end of each hose slightly shallower than the compressor side. Where possible, position the hose towards the centreline or keel of the boat. When the rising bubbles reach the hull, the resulting water flow can help create a larger ice-free area.
For motorboats with pronounced chines that interrupt the flow along the hull, position the hoses slightly further away from the hull.
The stainless steel holders should keep the hose stretched. The front and rear ropes can be angled up to approximately 45 degrees to create the necessary tension.
Remember: The hose may only have one highest point. Avoid kinks or pinching. This helps prevent condensation from becoming trapped and freezing inside the hose.
Shorter boats
If the boat is shorter than 12–13 metres, adjust the hose length accordingly.
If necessary, move the final holder further along the hose to achieve the correct rope angle. The remaining section of hose can be folded double and closed using a cable tie.
Dock
Position the hoses approximately 1.5 metres below the water surface along the outer edge of the dock or jetty.
Good circulation requires an unobstructed flow of warmer water from below. In shallow bays, access to warmer water may decrease during extended periods of very cold weather.
Unroll the hose on the dock and make sure it is not twisted before slowly lowering it into the water.
It can be helpful to position the hose just below the surface initially so you can visually check that it hangs straight and horizontally. Once the position is correct, lower it to the required depth using the ropes.
Keep the hose stretched by applying tension through the stainless steel holders at each end.

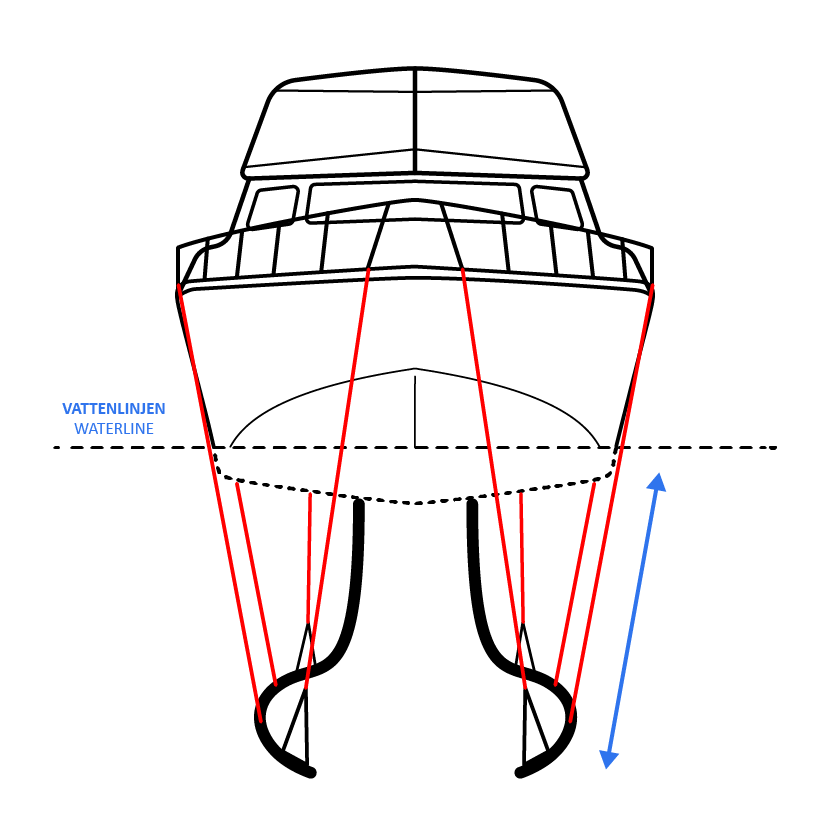
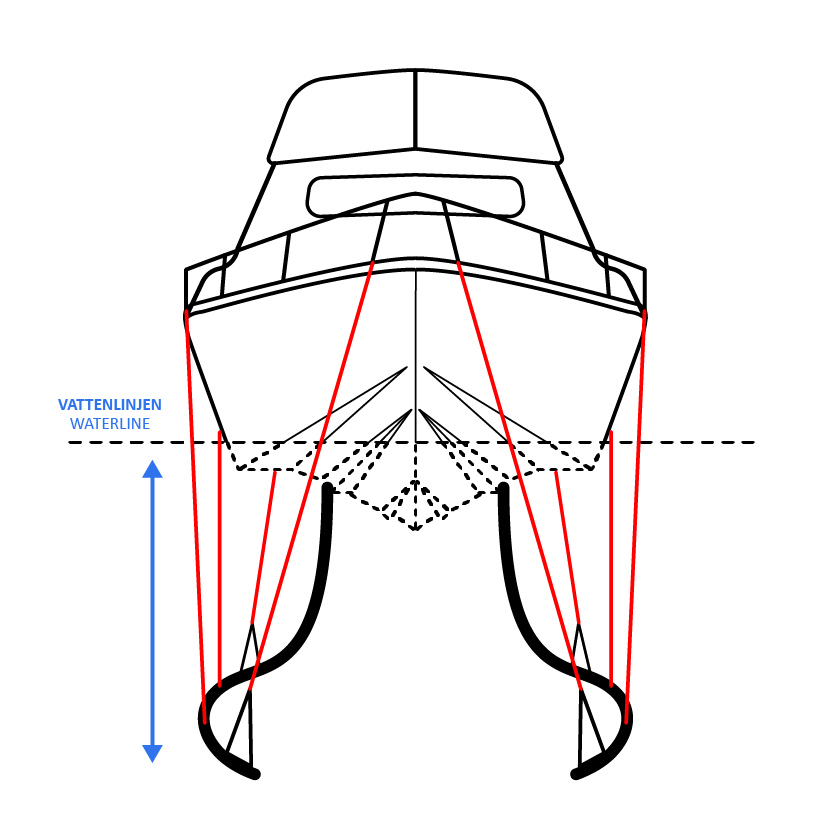

Angle the suspension lines to keep the hose stretched and taut.
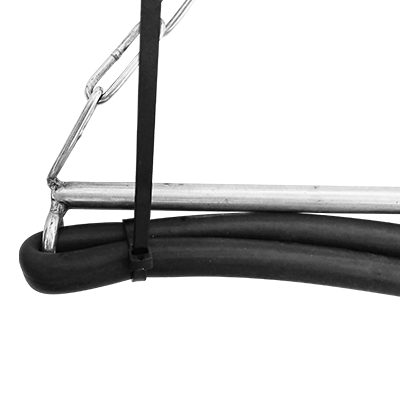
For boats shorter than 12–13 m, loop the excess hose and secure it with cable ties.
4. Connect the hoses
Screw the brass hose connector into the air compressor by hand until the rubber seal is properly seated.
Do not use tools. Hand-tightening is sufficient. Using tools may damage the rubber seal.
Connect the hose and tighten the supplied hose clamp. Start the compressor briefly and listen for any air leakage around the connection.
5. Test and adjust
The hose should hang as straight and horizontally as possible to achieve an even distribution of air bubbles.
Boat
Test the system in calm weather.
You should be able to see the bubbles bringing water towards the surface. When the flow reaches the hull, it is redirected outwards.
This movement of warmer water from below is what helps prevent ice from forming around the boat.
Dock
Check that the bubbles are reasonably evenly distributed along the hose.
If one section produces fewer bubbles, the hose may be twisted or hanging at an uneven depth. Raise the hose, check its position and adjust the ropes as necessary.
Some variation in bubble volume is normal. A deeper section of hose may produce fewer bubbles because of the increased water pressure.
6. Ready for winter
Once the installation and testing are complete, the VAKE De-Icer can be switched off until freezing conditions approach.
Start the system before ice begins to form.
When starting the system for the first time, it may take a few minutes for water to be cleared from the hose and for a steady flow of bubbles to develop.
Service & maintenance
Simple maintenance will help keep your VAKE De-Icer performing properly season after season.
Air filter
Check the air filter at the end of each season and clean it if necessary.
Locate the small tab on the plastic cover on top of the pump. Carefully remove the cover with a flat-head screwdriver, vacuum the filter and reinstall the cover.
Diaphragm
The compressor diaphragm is a wear part and should be replaced approximately every 5–6 seasons.
Important safety information
Keeping the water around your boat ice-free is only one part of safe winter storage.
The greatest concern is freezing around seacocks and through-hull fittings. Although the movement of warmer water created by the De-Icer can provide some warming, water inside fittings can still freeze during very cold weather.
Winter protection of seacocks is essential when storing a boat in the water and should never be neglected.
Different approaches are used for winterizing seacocks. Always check the requirements and recommendations of your insurance company.
Insulating the base of through-hull fittings and the lower sections of connected hoses can provide additional protection.
Troubleshooting
Not getting enough bubbles? Little or no airflow, uneven bubbling or reduced performance is often caused by hose placement, an ice plug, a kink or blocked air holes rather than a problem with the system itself.

WE’RE HERE TO HELP